Do VPNs leak DNS? Yes, and now looking for how to Prevent VPN DNS Leak? Use a VPN with a DNS Leak Protection Option, such as ExpressVPN, or manually set up a DNS server.
A DNS leak is a security issue that exposes DNS requests to ISP DNS servers when using a VPN provider to conceal them. Trustworthy and best remote access VPNs are designed to prevent leaks from occurring in the first place.
Sadly, most of the market’s subpar VPNs leak DNS, leaving you vulnerable to the internet. Using just a leaky VPN is even riskier than using the internet without a VPN since you’re aware of the potential of your privacy being compromised.
However, when you use a VPN, you may believe that you’re safe from cybersecurity risks and that your privacy is protected, even though the VPN leaks your DNS and jeopardizes your privacy behind your back.
Luckily, there are methods for preventing DNS leaks. In this article, I’ll discuss seven ways to prevent your VPN from leaking DNS.
How do I run a DNS leak test?
First, use various tools to perform a simple DNS leak test. When the test is completed, you can identify DNS leaks.
A DNS leak occurs when you see your exact location or the location of your ISP rather than the location of the VPN server. Finally, if you discover a DNS leak on your device while connected to a VPN, don’t worry; there are seven techniques how to prevent a VPN DNS leak at all times.
How to Prevent VPN DNS Leak? [7 Ways]
If you discover a DNS leak on your device while connected to a VPN in Canada, don’t worry; the seven ways will prevent DNS leaks in all instances. Now, you may wonder, “are VPNs legal in Canada?” VPNs are entirely legal and safeguard your personal information from security threats.
To resolve the VPN DNS leak issue, use the following methods:
1. Use a VPN With DNS Leak Protection Option
Getting a DNS leak protection VPN option is probably the easiest way to prevent DNS leaks. This useful feature monitors user DNS requests and ensures they are routed through the VPN DNS server. Look for the DNS leak protection feature in their settings.
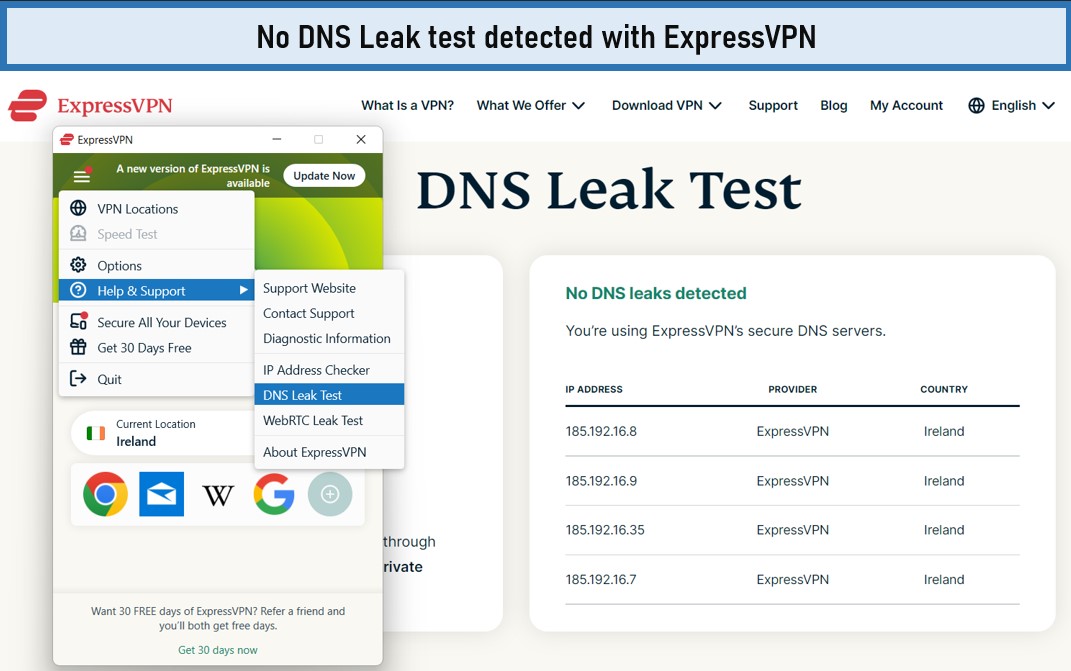
You may be wondering, “does ExpressVPN prevent DNS leaks?” So, We ran a DNS leak test with ExpressVPN for you and were blown away by the results, which showed that no traffic was allowed to bypass the security of the ExpressVPN tunnel. ExpressVPN is one of the best VPNs with a kill switch, split tunneling, and other encryption features that protect you against DNS and IP leaks.
Other platforms are also available, such as Surfshark, which includes DNS leak protection. Simply navigate to its settings and search for a DNS leak prevention option. Once you locate it, activate it to safeguard yourself from DNS leaks. It is considered the best VPN for VoIP to secure international and local calls.
2. By using VPNCheck – Pro Version
The VPNCheck (Pro version) includes a DNS leak repair. It safeguards users against DNS leaks, identity theft, and data snooping. You can easily download VPNCheck – Pro from their online webpage and proceed as follows:
- Download and run the application
- Click “Config” in the main window.
- From the ‘Config’ menu, tick the “DNS leak fix box.” You can add programs like uTorrent to the list so that your ISP cannot monitor your internet activity if the VPN connection is lost.
- Finally, return to the main window and start the ‘Cycle IP task‘ and ‘Cycle IP Network‘. Have a VPN experience without DNS leaks!
3. By Disabling Teredo
Teredo is a transition technology that enables interaction between two IP protocols, IPv4 and IPv6. However, the protocols are available on the internet and require a transition technology such as Teredo to interact. Teredo, on the other hand, has the potential to cause DNS leaks. To deactivate Teredo, follow these simple steps:
- Access the command prompt and type the following command:
netsh interface teredo set state disabled
- You have now effectively disabled Teredo. If you decide to reactivate Teredo at a certain point in the future, put the following line in the command line:
netsh interface teredo set state type=default
4. By Manually Setting up DNS Server
The simplest way to eliminate DNS leaks is to configure the DNS server manually. The steps below will assist you in eliminating DNS leaks by manually configuring a DNS server on your device:
- Deactivate your VPN’s DNS leak protection feature.
- Navigate to the Control Panel, Network Settings, and Network Connections.
- Right-click the network adapter you’re using and select Properties.
- Select Internet Protocol Version 4 (TCP/IPV4) from the list and then click on properties.
- Select “Use the following DNS Server Address” from the drop-down menu. Input the DNS server address as follows:
- DNS preference: 209.222.18.222
- Alternate DNS: 209.222.18.218
- You have successfully completed it.
5. By Blocking Non-VPN Traffic
A VPN with an IP Binding feature, such as “Hide My Ass,” is a better way to prevent DNS leaks. It lets you choose which applications will exchange information via the safe encrypted tunnel. If a user attempts to use certain applications without the need for a VPN, the application will be unable to connect to the internet.
6. By Configuring Firewall
Setting up your firewall to restrict all non-VPN traffic and keeping a Cybersecurity Checklist on hand will help shield you from DNS leaks and other security threats. Windows includes a firewall as a standard feature. Follow the steps below to configure the Windows firewall manually:
- Navigate to the Control Panel.
- Select the Windows Firewall option.
- Select “Allow a program or feature through Windows Firewall from the left pane.”
- You’re done! Use this feature to block all non-VPN traffic.
7. By Using Antivirus
A good antivirus program, such as AVG, includes a firewall that can be used to restrict all undesired network traffic. This method is simple and nearly identical to configuring a Windows firewall manually. The virus protection firewall enables you to prevent all non-VPN traffic, guaranteeing that your ISP’s DNS server is never used.
FAQs
How do I know if my VPN is leaking DNS?
Does a VPN protect DNS?
Is my VPN leaking my IP?
Wrap Up!
Every user has the right to online freedom. With numerous spying organizations, such as the NSA and GCHQ, constantly checking Internet users’ confidential info, VPN or a proxy provides users with reputable online data security and confidentiality.
Nevertheless, a DNS leak caused by Windows bugs negates VPN’s advantages. However, the seven Ways how to prevent DNS Leaks mentioned in this article will keep you protected from DNS leaks in all instances.